Thursday 12 October 2017

How To Make a Basket Cake step by step


The basket weave is one of those techniques that takes a little bit to learn, but once it 'clicks,' you can whip out a cake like this in 30 minutes flat!

Prepare the Cake:
Start with a cake that is covered with a thin coat of icing. This will do two things:
1- It will help the basket weave stick to the cake.
2- It will help blend in any mistakes you make by having the cake be the same color as the icing.


Step 1:
Using Wilton Tip #47 (or other basket weave tip), make a straight, vertical line from the top of the cake to the bottom. You want the back side of the tip to be lightly touching the side of the cake.
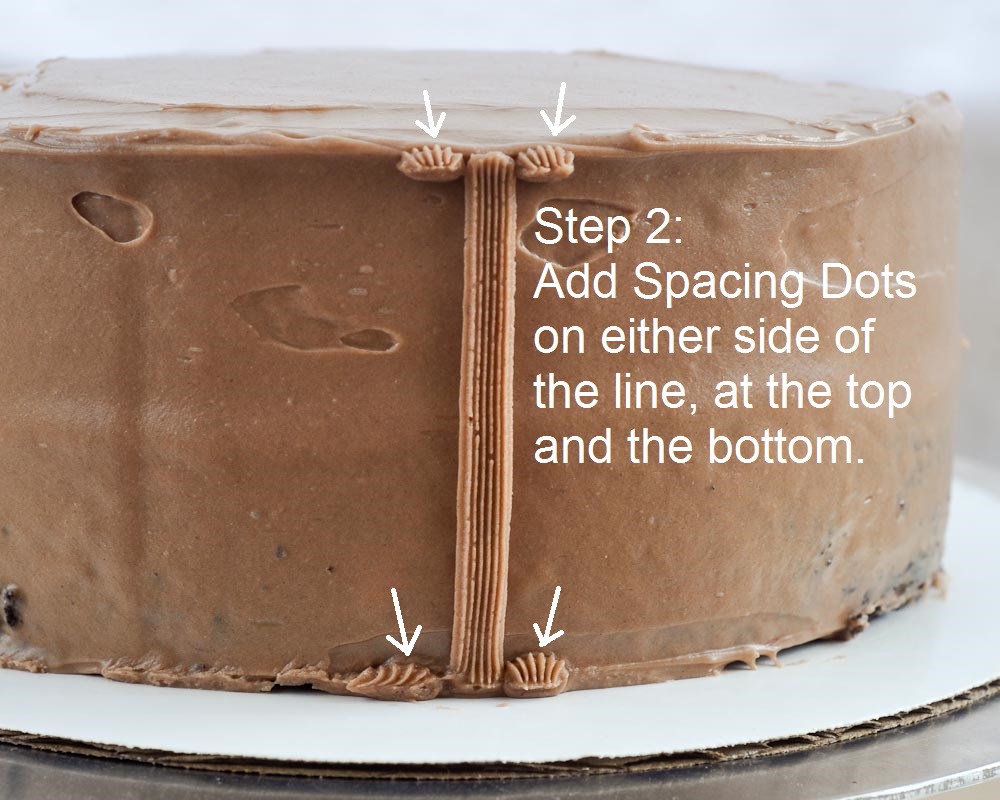

Step 2:
Add 'spacing dots' on either side of the vertical line as you see in the photo above. These dots will help you know how far to make your horizontal lines. Making them at the top and the bottom of the cake helps you keep the lines relatively even in length.


Step 3:
Begin making the horizontal lines. This is where it gets a little tricky.
You want to do every other line. To do this, I like to think it evens and odds. The first set, you will do lines 1, 3, 5, 7, etc. for the evens, you will do spacer dots like you did before... only these will go vertically. They take the place of where line 2, 4, 6, etc. go.


Start the horizontal lines from the bottom. I once heard the memory trick of "The firefighter climbs up the ladder, slides down the pole." In other words, you start your horizontal lines at the bottom and your vertical lines at the top.

Step 4:
When you've made your way to the top of the cake with your horizontal lines, turn the tip, and make another vertical line-- top to bottom-- that covers your spacer dots.


Step 5:
Now that you've made your first set of rows... on the odds... this set will be on the evens.
So, this time, you start line 1 with a spacer dot. And you will need a spacer dot both horizontally and vertically. One to mark how far over to go. One to mark your space in line 1.
You have bars on the evens this time: lines 2, 4, 6, 8, 10. Your spacer dots are on the odds: lines 1, 3, 5, 7, 9.


Sometimes it's hard to remember those spacing dots, especially the one that shows you how far to go over. But if you skip them, it's really hard to keep things even. And if you skip the spacing dots between each horizontal line, you'll get around to the other side of the cake, and you'll have a whole different number of lines because it's hard to keep the lines straight. (You can see that it's hard to keep them straight and even, even with the dots!!)


Step 6:
Continue alternating the horizontal rows, evens-odds-evens-odds... Remembering that vertical line each time. (That's what always seems easy to forget at first.)


source here

This looks good. I wonder if my mother feels like making cake

The chocolate frosting made me falter and I almost went for another recipe because 3 raw egg yolks could mean salmonella attacks, hospitalization and doctor's bills en masse. I decided to be brave and went ahead. We are all well, alive and hungering for more Dobos Torte. Thanks be to God.

I had cut the last piece of sponge layer into 8 wedges and separated them a little before pouring the amber caramel over. One thing I learned was that you only need to cut through the caramel when the caramel has hardened. With a very sharp knife. It is much easier than having sticky caramel globbing up your knife and gooey caramel threads stretching between your fingers endlessly.
A Dobos Torte looks much harder to make than it really is. And it is very very delicious and beautiful to look at. Maida Heatter's recipe is a winner. The birthday boys summed it. 

Cake :
7 egg, separated
3 egg yolks, additional
455 gm (1 lb) confectioner's sugar (icing sugar)
94 gm all purpose flour
1 T lemon juice
1/8 tsp salt

Frosting :
227 (8 oz) bittersweet chocolate ( I used 60 percent cacao)
226 (8 oz) gm butter
1 tsp vanilla
3 large egg yolks
2 T confectioner's sugar (icing sugar)

Caramel :
1/2 cup granulated sugar
1 T water


Make cake 
Line, butter and flour well 8 8 inch round pans or 7 9 inch round pans. I only had 3 8 inch round pans so I had some relining and buttering and flooring to do.
Pre-heat oven to 450 F
Beat 10 yolks on high of an electric mixer for a few minutes until it turns pale and lemon colored. Reduce speed, add sugar gradually and increase speed again and continue likewise until sugar is finished., and the mixture is thick and glossy.

In a separate bowl that is clean and dry beat egg whites until stiff peaks form.
Stir in a few tablespoons of the egg white into the egg yolk mixture to loosen the yolk mixture up. Then add the rest of the whites in 3 batches until the whole mixture is smooth. I used a wire whisk to do this.

Divide the batter into 8 or 7 portions depending on the size of your pan ( I weighed my batter) and pour into tins, leveling the batter and baking each layer for 5 minutes.
Keep the baked sponges aside and if you stack them please make sure you have a baking paper in between.

Make frosting 
Melt chocolate until smooth. Set aside to cool to room temperature. In a bowl of an electric mixer, beat butter till soft and smooth. Add vanilla and 3 egg yolks. Add sugar and cooled chocolate beating well until thoroughly mixed.
Spread this frosting thinly on each layer on cake leaving one layer unused.
Cover the whole cake with the chocolate frosting and chill in the fridge while making the caramel layer.

Make Caramel Layer 
Place the unused layer of sponge on baking paper. Cut them into 8 wedges. Separate them a little.
Meanwhile, place sugar and water in a small pan and heat on high until the sugar melts and turns amber. Immediately take off heat and pour the caramel over the cut sponge cake.Let the caramel cool and harden somewhat before cutting with a very sharp knife separating the wedges and neatening the edges if necessary. 

source here 

Wednesday 11 October 2017

Daring Bakers Challenge ( Homemade Graham Crackers and Nanaimo Bars )

The task this month? First, to make your own homemade graham crackers. The suggestion was to make them gluten-free, with the option to use all wheat flour if you preferred to do so; I chose the latter. From there, the mandate was to use the crackers as one ingredient in the preparation of a sweet Canadian classic called Nanaimo Bars.
Why did this month's host, Lauren, pick Nanaimo Bars? Well, she hails from that maple leaf lovin' land, which I might add is just a hop, skip, and a jump away from the Detroit area. And, what with the Olympics arriving there soon, she felt it would be appropriate to select a home-country treat. (Hey, you guys wanna go to Canada? No problem. Just go get in my red minivan, buckle up, and I'll have you in Windsor, Ontario in a few minutes. 

Anyway, back to business. Below is the official Daring Bakers scoop, direct from the horse's mouth, so to speak, along with the recipes we had to follow. (I substituted unbleached all-purpose flour for all of the gluten-free flours, and that worked like a charm.)
For Gluten-Free Graham Wafers
Ingredients:

1 cup (138 g) (4.9 ounces) Sweet rice flour (also known as glutinous rice flour)
3/4 cup (100 g) (3.5 ounces) Tapioca Starch/Flour
1/2 cup (65 g) (2.3 ounces) Sorghum Flour
1 cup (200 g) (7.1 ounces) Dark Brown Sugar, Lightly packed
1 teaspoon (5 mL) Baking soda
3/4 teaspoon (4 mL ) Kosher Salt
7 tablespoons (100 g) (3 ½ ounces) Unsalted Butter (Cut into 1-inch cubes and frozen)
1/3 cup (80 mL) Honey, Mild-flavoured such as clover.
5 tablespoons (75 mL) Whole Milk
2 tablespoons (30 mL) Pure Vanilla Extract


Directions:
1. In the bowl of a food processor fitted with a steel blade, combine the flours, brown sugar, baking soda, and salt. Pulse on low to incorporate. Add the butter and pulse on and off, until the mixture is the consistency of a coarse meal. If making by hand, combine aforementioned dry ingredients with a whisk, then cut in butter until you have a coarse meal. No chunks of butter should be visible.

2. In a small bowl or liquid measuring cup, whisk together the honey, milk, and vanilla. Add to the flour mixture until the dough barely comes together. It will be very soft and sticky.

3. Turn the dough onto a surface well-floured with sweet rice flour and pat the dough into a rectangle about 1 inch thick. Wrap in plastic and chill until firm, about 2 hours, or overnight.

4. Divide the dough in half and return one half to the refrigerator. Sift an even layer of sweet rice flour onto the work surface and roll the dough into a long rectangle, about 1/8 inch thick. The dough will be quite sticky, so flour as necessary. Cut into 4 by 4-inch squares. Gather the scraps together and set aside. Place wafers on one or two parchment-lined baking sheets. Chill until firm, about 30 to 45 minutes. Repeat with the second batch of dough.

5. Adjust the rack to the upper and lower positions and preheat oven to 350 degrees Fahrenheit (180 degrees Celsius).

6. Gather the scraps together into a ball, chill until firm, and reroll. Dust the surface with more sweet rice flour and roll out the dough to get a couple more wafers.

7. Prick the wafers with toothpick or fork, not all the way through, in two or more rows.

8. Bake for 25 minutes, until browned and slightly firm to the touch, rotating sheets halfway through to ensure even baking. Might take less, and the starting location of each sheet may determine its required time. The ones that started on the bottom browned faster.


9. When cooled completely, place enough wafers in food processor to make 1 ¼ cups (300 mL) of crumbs. Another way to do this is to place in a large ziplock bag, force all air out and smash with a rolling pin until wafers are crumbs.

Nanaimo Bars

Ingredients:
For Nanaimo Bars — Bottom Layer
1/2 cup (115 g) (4 ounces) Unsalted Butter
1/4 cup (50 g) (1.8 ounces) Granulated Sugar
5 tablespoons (75 mL) Unsweetened Cocoa
1 Large Egg, Beaten
1 1/4 cups (300 mL) (160 g) (5.6 ounces) Gluten Free Graham Wafer Crumbs (See previous recipe)
1/2 cup (55 g) (1.9 ounces) Almonds (Any type, Finely chopped)
1 cup (130 g) (4.5 ounces) Coconut (Shredded, sweetened or unsweetened)


For Nanaimo Bars — Middle Layer
1/2 cup (115 g) (4 ounces) Unsalted Butter
2 tablespoons and 2 teaspoons (40 mL) Heavy Cream
2 tablespoons (30 mL) Vanilla Custard Powder (Such as Bird’s. Vanilla pudding mix may be substituted.)
2 cups (254 g) (8.9 ounces) Icing Sugar


For Nanaimo Bars — Top Layer
4 ounces (115 g) Semi-sweet chocolate
2 tablespoons (28 g) (1 ounce) Unsalted Butter
Directions:
1. For bottom Layer: Melt unsalted butter, sugar, and cocoa in top of a double boiler. Add egg and stir to cook and thicken. Remove from heat. Stir in crumbs, nuts, and coconut. Press firmly into an ungreased 8 by 8-inch pan.


2. For Middle Layer: Cream butter, cream, custard powder, and icing sugar together well. Beat until light in color. Spread over bottom layer.


3. For Top Layer: Melt chocolate and unsalted butter over low heat. Cool. Once cool, pour over middle layer and chill."


source: here

Tuesday 10 October 2017

Those wafers and cute cones look wonderful and fabulous.

And am back! Please don't tell me you have forgotten me! While I had planned a whole list of things to do, bake, write about and build a bursting folder of posts no less for the post-break blogging, I have actually been able to do very little of it. I am as usual huffing and puffing away to compile a post - some things never change! Like the tendency for Cakes And More showing on me - every now and then. Me trying hard to knock-off that exx...extra kilos while also struggling to resist the pull of my oven, bread machine and the rest of the baking toys. And of course the itch to blog. Perpetually confused me is now more confused about what I can bake and blog about as I have temporarily no luxury of tasting and testing calorie-dense treats, cake or dessert very often. I really need to watch what I eat and how often I indulge...
But I am so thankful for the small portion of dessert I am allowed every week, reserved for my bakes predictably. This week's calories found themselves in these delicate coconut tuiles. I love coconut and these wafers are great on their own. And the delectable thought of filling it with some fruit and ice-cream giving it a more tropical twist was too good to resist! 
Eat the tuiles as is or poise them over some pannacotta. Add a dash of rum to the batter if you are a rum person and serve with whipped cream or pineapple or mango ice cream and some diced tropical fruit you will be transported to Hawaii!! 
Don't shy away from baking tuiles like I have earlier thinking that these are tricky to make. If you can separate eggs and can time baking your cookies, you certainly must try these! Don't let the part of coaxing the hot wafers from the baking sheet and shaping them in nano-seconds deter you. Usually, if your wafers harden before you have a chance to shape them, you pop them back in the oven to soften and then shape. Well, I simply bake all my tuiles, let them cool. Then I put them one at a time in the oven for about 30 seconds to soften them and then shape them. Easier this way and no burning your fingers!
Equipment - Baking trays or pans or cookie sheets, silicone baking mats, heavy-duty aluminum foil dull side up. I use my baking trays lined with aluminum foil, dull side up. I used 2 trays and lots of foil as I needed to use a fresh piece of foil for each batch. A very thin metal spatula if you want to attempt to remove the hot cookies from the foil, cooling rack.
Ingredients: 
To make forty 3'' tuiles ( I made a quarter of the recipe to make about 10 tuiles)
Unsalted butter - 3 tablespoons / 42 grams approximately, melted and still very warm (not hot)
Unsweetened coconut (peeled and grated dry copra) - 1 cup / 3 oz / 84 grams approximately
Sugar, fine - 2/3 cup / 4.625 oz / 130 grams approximately
Egg whites - 3 large / 90 grams
All-purpose flour - 1/4 cup plus 1 tablespoon / 1.5 oz / 42 grams
Salt - 1/8 teaspoon
Rum - 1 tablespoon ( I used vanilla extract)
Procedure: 
If baking cookies immediately, preheat oven to 150 degrees C / 300 degrees F. If baking cookies later, just mix the batter as mentioned below and refrigerate.
If you would be using foil, measure the size needed to line your tray or pan. Cut carefully making sure you do not cause major creases. If there are any small creases smooth it out. Wrinkles will mar the appearance of the cookies. Line your pan or pans if using multiple ones. You could mark the outline of a 3'' circle with a food grade pencil. Grease the foil with butter lightly but thoroughly. Large cookies sheets will be great, I used my 9'' square tin to bake 2 at a time. 
In a small bowl, whisk together all the ingredients till well blended. We are not whipping up a volume here, just simple whisking. The batter will look very thick and you will wonder how this could be actually spread thin. Let the batter rest for at least 10 minutes or keep covered in the refrigerator for up to 3 days. I used the batter the next day. The batter firms up on refrigerating and loosens up a bit after it comes out of the fridge. 
Drop level teaspoons of batter 2 inches apart on the prepared foil. Using the back of a spoon, spread the batter evenly in 3-inch rounds or oval or another shape about 1/16 of an inch. This will look like some egg whites here and there and the coconut here and there. If using multiple trays, you could spread the batter and keep the trays in the oven one by one. If using the same pan for the next set of tuiles, make sure the pan is cool before you spread the batter.
 
Bake for 10 to 11 minutes. The time depends on the thickness of the cookies. Watch very carefully, bake the cookies are mostly golden with splotches of white here and there. Rotate pans if using a large oven and multiple sheets. If the cookies are not baked thoroughly, they won't be completely crisp when they cool. A test batch must tell you the approximate baking time. I baked for about 11 minutes.
Remove the cookies sheets or pans from the oven and set them down. Keep your rolling pin/cup right beside the oven if you want to curve them or shape them into cups. You won't have time to turn, go to the table and then shape.You are supposed to slide a very thin metal spatula when the cookie is still hot and soft. Then shape it immediately into a curve or cigar and cool it on a rack. If the cookies harden before you shape, pop them back in the oven for a few seconds, they will soften, you can shape again. I normally let them cool and harden, then peel the foil from underneath the tuiles very gently taking care not to break the tuiles. After baking all of the cookies, I put one cookie at a time in the oven (the underside of the cookie facing up, so that when you pick up the cookie and shape it into a cone, you have the right side facing outward) on the sheet for 30-40 seconds till they became very soft and flexible. Then shaped them. They harden very very quickly as in a matter of 4-5 seconds, so its really important that you work very quickly. Timing is everything here! And psstt...even if you can't get them pretty and shaped, they will still taste delicious!

source here 

Monday 9 October 2017

This is an awesome way to make use of leftover products. loved it truly!

This strawberry-banana ruffle cake is much easier than most. For this 2-layer 6" round cake, I spent less than half an hour piping the decoration.
What You Need: 
6-8" Round Cakes (2-3 layers)
Buttercream Icing
Piping Bag fitted with Tip #21
Bake the cakes, cool them, and level the top.
Make the Icing... The Strawberry Buttercream really is my favorite,  
Stack the cakes, with a layer of buttercream in the center.
Coat the cake with a thin layer of icing. It's okay if it's a little messy. You just need this layer in case your ruffles (shells) are a little too far apart, then you won't be able to tell if your cake underneath is the same color!
To make the easy 'ruffle,' you add shells all around the cake, being careful to try to alternate where the top, fatter part, of the shell and the thinner tail of the shell go.
To make a shell, you use an open star tip, 
Hold the bag parallel to the side of the cake, with the tip almost touching. Squeeze and move the tip back gently into the icing to create the fatter part, slowly move the tip along the surface about 1/2-inch, relaxing your squeeze as you go to create a tail. Start the next shell ruffle about 1/4-inch from the previous tail.
You do the same along the top in rings as you move toward the center.

source here 

Cupcakes and Tarts

A friend of mine needed treats to take with her to a baby shower. So I decided to make her Lemon Cupcakes with Raspberry Buttercream Frosting and Lemon Curd Tarts. The tart dough is Pâte Sucrée dough, which in my opinion, is the best dough to use in sweet tarts. It's simple to make and keeps well in the freezer if you do not use it all.
I was worried about the seeds in the raspberry puree I made being too much in the buttercream, but it turned out really well. The flavor is both sweet and tart and I think it's a good balance with the lemon cupcake.
I hope that her guests enjoy them. I'm going to keep this on my list of cupcakes that are winners so I can make them again in the future.

source here 

Sunday 8 October 2017

Wow, this cake looks delicious! I don't like goat cheese though

Until now, I don't think I've ever needed to pair the words "goat" and "cake" in a sentence. I don't know about you, but if I've got a cake anywhere in the vicinity, I don't particularly want a goat hanging around.
The seeming incongruity of goat-cheese cake is kind of like the juxtaposition of the words "hippo" and "soup," or maybe the marriage of "rat" and "candy." Not charming images, right? So I understand if you're feeling a little wary.
Goat cheese, though, is quite civilized. It's like a happy cross between cream cheese and sour cream--kind of soft, beautifully white, and just a little tangy. It's the perfect base for a simple variation on the traditional creamy cheesecake, but without the heaviness. And I hesitate to even lump this recipe into the cheesecake category because it's kind of a unique hybrid; besides the cheesy factor, it also contains fluffy beaten egg-whites that get folded into the batter, as well as a very small amount of flour.
Essentially crustless, the cake's golden edges are the result of a sugar-dusted pan. Ribboned with fresh mango sauce and garnished with a few perfect blackberries, this makes for a pleasing little dessert. So, is it a cheesy cake . . . or is it a cheesecake? Is it a goat-cheese cake, or a goat cheesecake? We may never know. It's just good and, in the end, that's all we need to know.
As for the recipes . . .
I adapted this cake recipe from Emily Luchetti's book, Classic Stars Desserts, and the mango sauce recipe from Nick Malgieri's book, Perfect Pastry.
What did I change? Well, I tweaked the basic flavor of the cake by prohibiting all lemoniness; the original recipe includes both zest and juice, neither of which I was in the mood for. Also, I decreased the amount of sugar in the cake slightly and compensated for that by adding in one heaping tablespoon of clover honey, just because I love the warm taste that even a small amount of honey can lend. I increased the amount of vanilla by 50 percent because honey and vanilla love each other. (Seriously, they do.)
As for the mango sauce, Malgieri's recipe called for a tiny bit of white rum, which I didn't include. Had I had some of that on hand, however, I probably would have used it. And, as is my habit, I reworded the instructions considerably for both recipes.
You don't need much time to slap this together, all in all, but I do recommend you chill the cake for a while before serving it. Beware that once it's completely cold it'll look a bit shrunken, like in the picture just below, but don't let that scare you. All is well.
I think the mango sauce tastes best well chilled, too. And the blackberries, of course, aren't what I'd call mandatory, but they do dovetail nicely with the other flavors and, heck, they're just so darned cute. Splurge on a small-package of nice ones, yes?


source here

This cake looks perfectly moist and soft. It belongs on the cover of Bon Appetit. Your Kahula buttercream sounds to die for!


Recipe selection, on the other hand, is usually much less complicated. With the team's cake in mind, I tested out this vanilla cake from Baking at Home with the Culinary Institute of America. A classic butter-based layer cake, it has warm well-rounded flavor and fine texture. It reminded me, in fact, of the sumptuous layer cakes we used to buy occasionally from Sanders stores when I was a child. Sanders was the purveyor of choice, in the Detroit area, for rich baked goods, incomparably smooth ice cream, and velvety chocolates. If you're from around here and you're at least forty years old, you probably know all about the heyday of Sanders. It's sort of still around, in name at least, though sadly only as a pale version of its former self.

About this recipe . . . 
I altered the cake recipe only by upping the vanilla ante a bit, adding in the seeds from half a vanilla bean. For the icing, I used a swiss meringue buttercream that I found in an old copy of Icing the Cake, by Jill Van Cleave, and I customized it by adding a dash of Kahlua to turn it into a tasty mocha buttercream. A Swiss meringue buttercream isn't nearly as nerve-wracking to make an as Italian meringue buttercream, and I think it's just as good. No hot sugar syrup to pour slowly between the spinning beaters and the side of the mixing bowl, thank heaven. You just whisk the sugar and egg whites over a double boiler for a while, then put the bowl onto the mixer, slowly add in the butter, then the flavorings, and beat-beat-beat until the cows come home. Eventually, it all comes together into something soft, silky, and supernaturally spreadable. 
I reworded both recipes, as usual. Can't help myself.
Vanilla Layer Cake with Mocha Swiss Meringue Buttercream 

For the cake:
Preheat oven to 350 degrees. Butter or grease two 8" round pans, or use baking spray. Cut out 8" rounds out of parchment and place one in the bottom of each pan. Butter/grease the parchment.


3 and 1/2 cups cake flour
2 cups granulated sugar
1 Tbsp. baking powder (Yes, one whole tablespoon.)
1/2 tsp. salt
1 cup unsalted butter, diced into small chunks, at room temperature
1 cup milk (I used 2 percent.)
4 eggs, large
2 egg whites, from large eggs
1 and 1/2 tsp. vanilla extract
Seeds scraped from half of one vanilla bean (I used a Madagascar bean.)


Sift together, into the large bowl of your mixer, the first four ingredients. Using the whisk attachment, add in all of the butter and half of the milk. On medium speed, until smooth, mix for just about four minutes. Stop to scrape the bowl and beater as needed.

In a medium-size bowl, blend together the eggs, egg whites, remaining milk, vanilla extract, and the vanilla bean seeds. In three additions, add this into the mixer bowl, beating on medium speed for no longer than two minutes for each addition. Be sure to stop and scrape as needed.

Portion the batter evenly into the two pans and bake at 350 for 35 to 40 minutes, until the cakes spring back lightly when touched.

Let the cakes cool almost completely on wire racks, in their pans. Run a thin knife or metal spatula around the sides, then carefully invert them out of the pans.

Mocha Swiss Meringue Buttercream (Yield: 3 cups)

1 cup unsalted butter, room temperature, cut into 1/2" chunks
2 oz. good quality bittersweet chocolate, cut into very small pieces (I used Scharffenberger.)
3 large egg whites
1 cup superfine sugar
1 Tbsp. Kahlua (coffee flavored liqueur)

In a small bowl, melt the chocolate, then let it cool to almost room temperature.
Put the sugar and egg whites into the large metal bowl of your mixer. Using a hand whisk, blend the sugar and egg whites. Place the bowl over a large saucepan on the stove, containing a couple inches of simmering water. Whisk continually by hand until the mixture feels very warm, but not hot.
Place the bowl on your mixer and, using the mixer's whisk attachment, beat on medium speed until the meringue begins to form; it should look white, shiny, and form medium-soft peaks. At this point, start to add the butter one piece at a time, continually. The icing will begin to resemble butter. Still beating on medium speed, add in the melted chocolate, and then the Kahlua. Keep beating until the mixture begins to thicken. This could take at least ten minutes, so be patient. (Some recipes for meringue-based buttercreams, in fact, have you mixing for as long as thirty-five minutes! Don't believe me? Check out some of the wedding-cake diva Sylvia Weinstock's recipes!)
If the mixture starts to look curdled, don't worry, just keep mixing and it will come back together. If the mixture looks okay but seems too warm, take the bowl off the mixer and refrigerate it for about five minutes then put it back on the mixer; chances are it will thicken up quickly after that. You want it to be soft and silky, and it should be extremely easy to spread.

source here

Saturday 7 October 2017

Wow, this looks really good! I have not made any cheesecake in ages. Yours look incredibly delicious!

I experienced a few intriguing culinary firsts this past week. First, among them, I learned how to stretch and shape strudel dough in my Pastry I class. I've wanted to witness this procedure, live and in person, for years. It's pretty much a lost art among home bakers. Picture a small cluster of students, all clad in white, solemnly pulling a small lump of dough into a tissue-paper-thin sheet that's several feet long and wide. I felt kind of like I was participating in an ancient ritual. Chef Roger, our normally rather taciturn teacher, was clearly pleased to demonstrate and explain the technique, regaling us with funny anecdotes of the portly Austrian chef who trained him.
Secondly, I was introduced to the quince! A fruit that looks kind of like a cross between an apple and a pear, I'd never tasted one before. They're not common here in Michigan, and not a single student in our class could identify one when the Chef showed it to us. The following day, I discovered some at the grocery store and scooped up four to take home, so now I'm on the hunt for a good recipe to try them out. 
The fourth notable first was the creation of this fluffy yogurt-based cheesecake, along with the accompanying brittle garnish made from Marcona almonds. I'd never made a cheesecake that was so dependent upon yogurt before, nor had I ever tried the famous Spanish Marconas.
I've read rave reviews in the past about these special almonds so when I stumbled upon them recently in Trader Joe's, I grabbed one of the little pouches. Consider yourself forewarned that these babies don't come cheap. They cost about the same as macadamias, but really are delicious. Not as hard and crunchy as regular almonds, they're also rounder and sweeter. A fine nut to use in brittle. I recommend them.

About this recipe . . .
Among my favorite dessert cookbooks is Dolce Italiano: Desserts from the Babbo Kitchen, by Gina de Palma, and both recipes are adapted from it. I altered the recipes for the cake and the brittle a bit. I decided to flavor the cake with orange zest and a dab of orange extract so it wouldn't be just plain vanilla.
This crustless cake is rather airy and fragile in comparison to a typically dense cheesecake. It's a light fresh alternative to the norm, and the addition of the buttery, sweet-salty, crushed brittle topping adds unique texture interest. Very tasty indeed. 
For the cheesecake: 
Preheat your oven to 350 degrees, and lightly butter a 10" springform pan. Sprinkle a couple teaspoons of granulated sugar in the pan to coat the bottom and sides; tap out the excess. Fit a couple sheets of foil tightly around the outside of the pan, beneath the bottom and up the sides. This will sit in a water bath while the cheesecake bakes, so the foil sheets really need to be able to keep the water out. You'll need a large pan that's deep enough to accommodate a couple of inches of water, and wide enough to hold your cake pan without it touching the sides.

3/4 cup granulated sugar
3 cups of plain, unflavored Greek-style yogurt (I used the higher fat variety)
1 lb. of cream cheese, softened and slowly but thoroughly mixed with 3 Tbsp. heavy cream (In lieu of this, the original recipe calls for 1 and 1/2 cups of mascarpone cheese; I didn't have that on hand so this was a good substitute.)
3 Tbsp. confectioners' sugar
3 large eggs, at room temperature
6 large egg yolks, at room temperature
1/2 tsp. kosher salt
1 and 1/2 tsp. vanilla extract (I used 1 and 1/2 tsp. of vanilla bean paste instead; it is a thick liquid that visibly contains vanilla bean seeds)
1 tsp. orange zest
1/2 tsp. orange extract

source: here